MSTICPy Settings Editor
The Settings editor is a collection of classes that let you manage and edit your MSTICPy settings.
This document is a walkthrough of using these classes to create your settings from scratch.
There is also a notebook that follows this flow. You can download and use this to configure your settings - MPSettingsEditor
You should also read the companion document *MSTICPy* Package Configuration, which has more information about individual settings.
To load the editor classes run the following.
from msticpy.config import MpConfigFile, MpConfigEdit
This loads MpConfigFile - a tool to manage settings files - and MpConfigEdit. MpConfigEdit is the user interface for adding and editing individual settings.
Warning
Creating and editing your settings will likely involve displaying secrets such as API Keys in the Jupyter notebook that you are using to edit the settings.
These secrets may be persisted in the notebook you are using and in
the checkpointed auto-save copy that Jupyter keeps in the .ipynb_checkpoints
sub-folder. To remove these, clear all cell outputs and then save the notebook.
This should remove any output from both the main copy of the notebook
and the checkpoint copy. For the very security-conscious, it is also a
good idea to clear your browser cache, or use the settings notebook in
private mode.
These secrets are never normally displayed by MSTICPy, nor are they stored in the browser memory so should never appear in your browser cache. When editing or displaying those settings though, both of these happen. Caveat emptor!
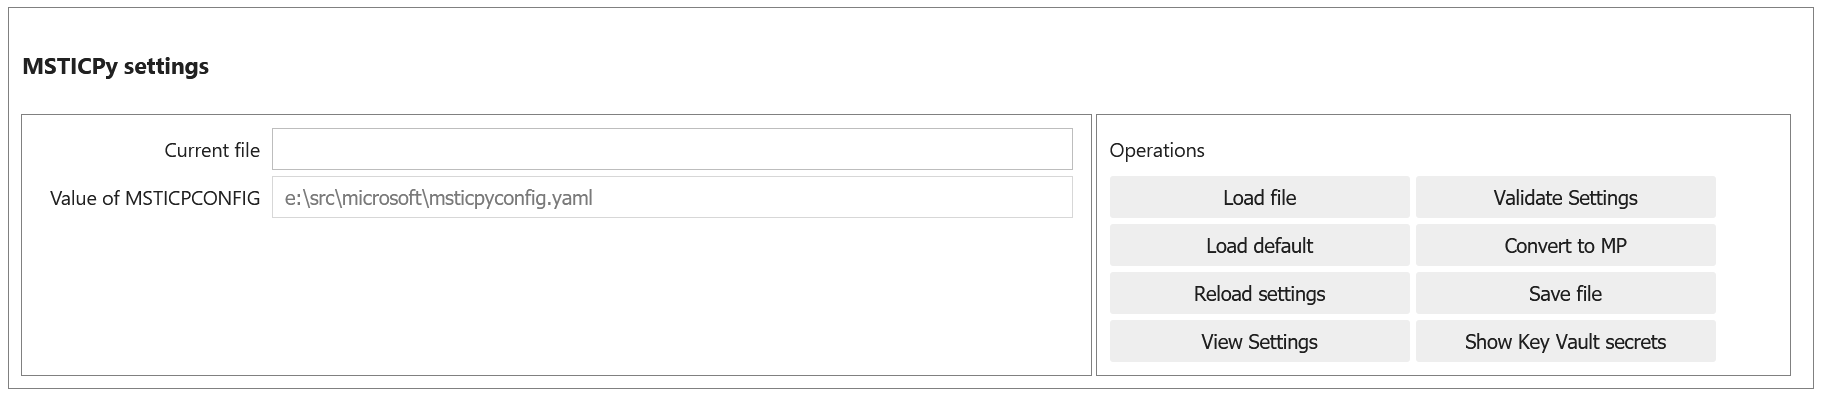
Checking your existing settings
You can use MpConfigFile from the command line or as an interactive UI to do this.
mpconfig = MpConfigFile()
mpconfig.load_default()
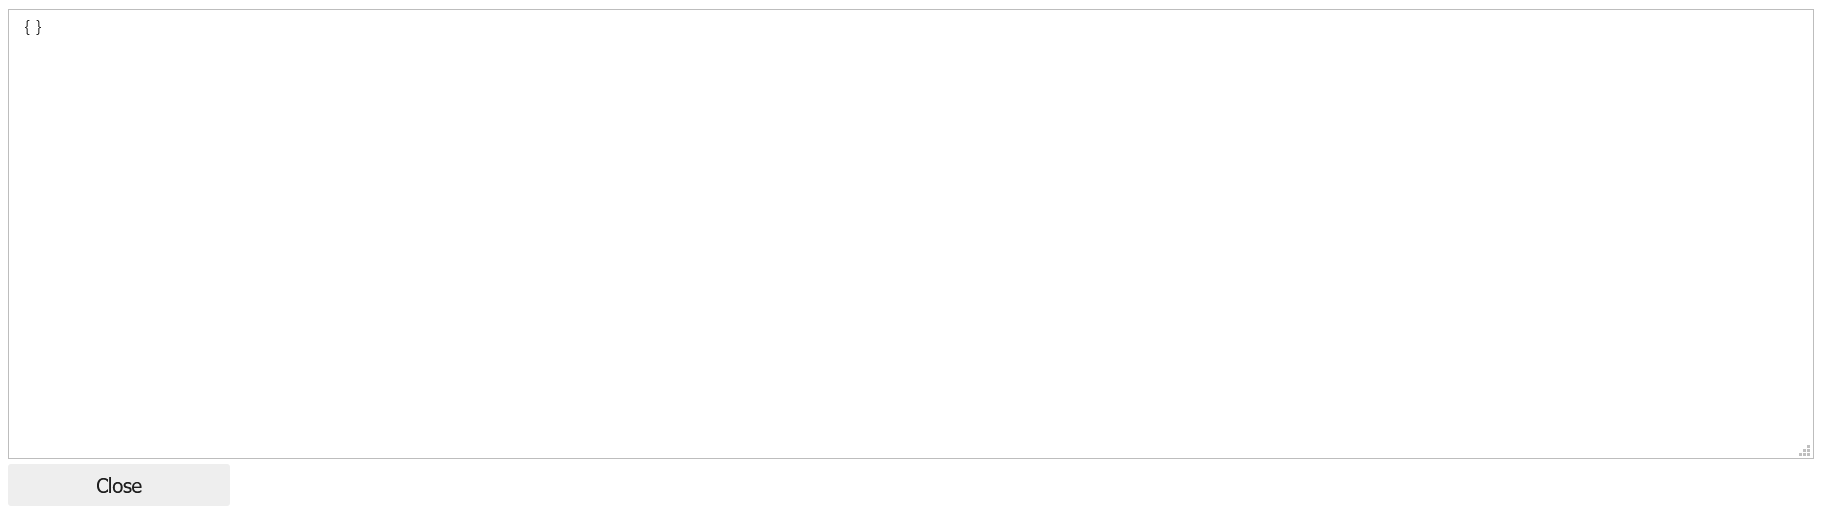
mpconfig.view_settings()
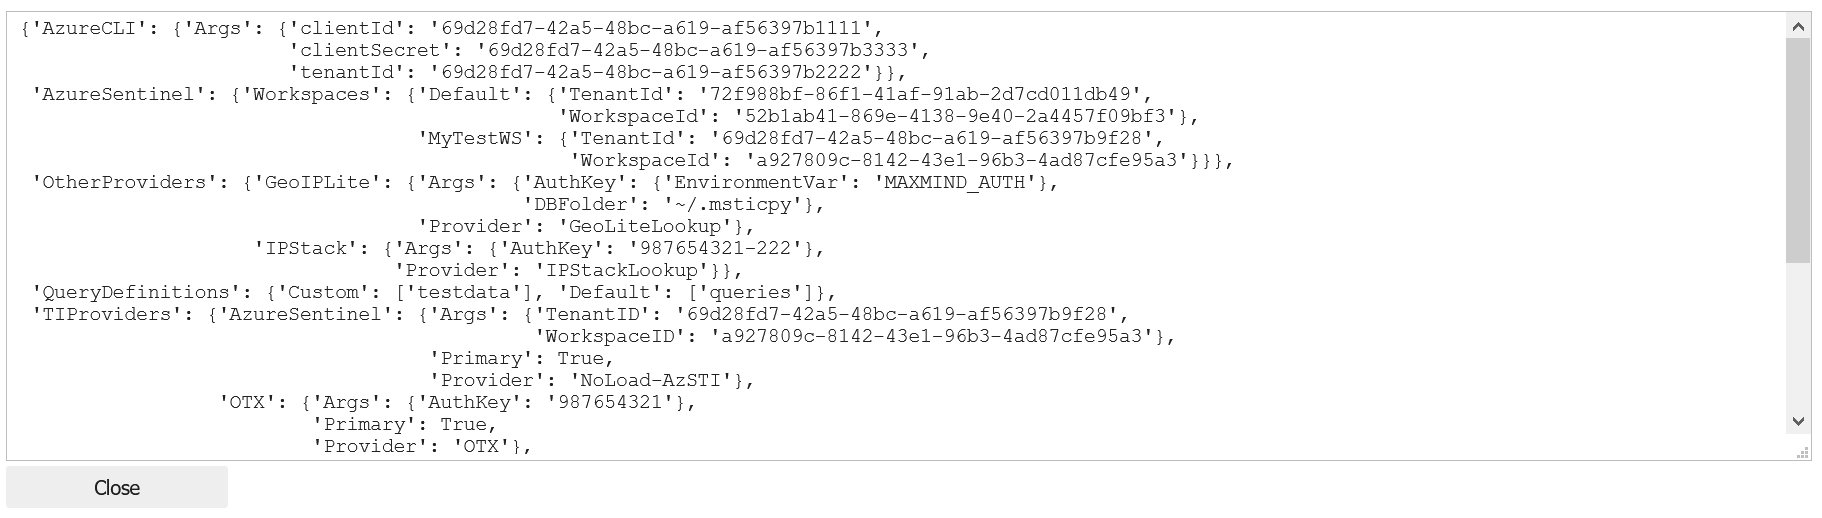
image.png
If you see nothing but a pair of curly braces in the settings view above it means that you
should set up a msticpyconfig.yaml.
Note
If you know that you have configured a msticpyconfig file
you can search for this file using MpConfigFile. Click on Load file
and browse to or search for the file.
Once you’ve done that go to the Setting the path to your
msticpyconfig.yaml
to set your MSTICPYCONFIG environment variable.
Import your Config.json and create a msticpyconfig.yaml (Azure Sentinel)
Azure Sentinel creates a config.json file in the root of your
notebooks user folder. This contains configuration details about the
Azure Sentinel workspace that you launched the notebook from. However,
the format is slightly different to the settings format used by MSTICPy.
Follow these steps to find and convert your config.json:
Run
MpConfigFile()(see the code immediately below)Locate your
config.jsonclick the Load file button. There are two options for finding a file.
Browse - use the controls to navigate to find config.json
Search - set the starting directory to search and open the Search drop-down
When you see the file click on it to select it and click Select File button (below the file browser). The Select File button will act on the last file you selected - whether in the file directory listing or the search results.
optionally, click View Settings to confirm that the settings in the
config.jsonlook right
Convert the config settings to msticpyconfig format
click Convert to MP
click View Settings
Save the file
type a path into the Current file text box
Click on Save file
You can set this file to always load by assigning the path to an environment variable. See Setting the path to your msticpyconfig.yaml
mpconfig = MpConfigFile()
mpconfig
This is the equivalent of the previous steps from the command line, which is probably faster if you know where your config file is.
mpconfig = MpConfigFile()
mpconfig.load_from_file("E:\\src\\asi-jupyter\\notebooks\\config.json")
mpconfig.map_json_to_mp_ws()
mpconfig.settings
{'AzureSentinel': {'Workspaces': {'ASWorkspace': {'ResourceGroup': 'ASWorkspaceRG',
    'SubscriptionId': '2c1bc08d-6a9e-43f0-aa55-a84f383b1a6b',
    'TenantId': '3f3fb3df-3c79-4407-8043-4a765430db0e',
    'WorkspaceId': '722f602f-340e-47a1-8d0a-c2b6a8fbc4c4'}}}}
Edit your msticpyconfig settings
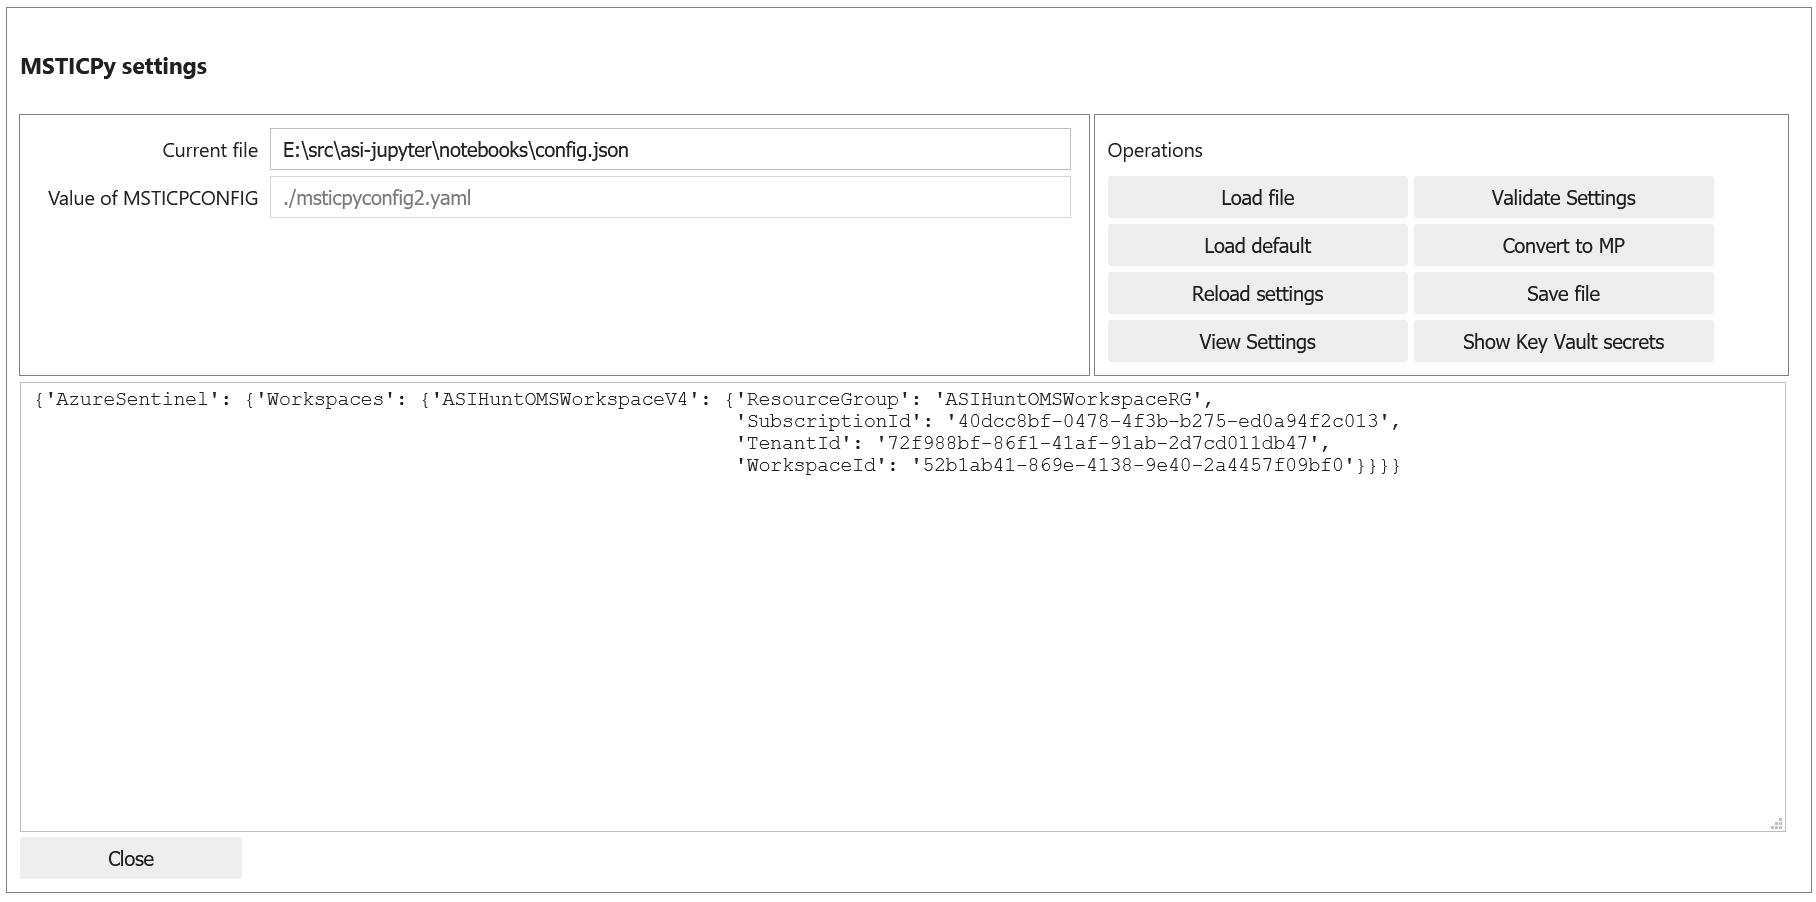
MpConfigEdit
To do this we’ll be using the configuration editor MpConfigEdit. It uses a tabbed interface to show different settings sections.
As well as showing settings, there is text box to input a file name to save the settings to - with a corresponding Save Settings button.
Note
Each settings tab has a Save button. This saves changes on the current editor screen to an in-memory copy of your settings. They are not saved to a file until you enter a file name and click on Save Settings.
The Validate Settings also lets you check on the status of the settings. It does a logical check (for sections/settings that you probably need) as well as a structural check to make sure that setting syntax is specified correctly. The results of the validation are shown in a text view box. Close this when you are done with the Close button.
There is also help for the settings available on each tab, with links to more detailed documentation.
MpConfigEdit has a single parameter settings. This can take be:
a file path - it will try to load settings from the file.
an instance of
MpConfigFile- it will load the settings loaded by this tool. This is useful if you need to search for a file using MpConfigFile and then edit the settings.a settings dictionary - the msticpyconfig settings converted from YAML into a Python dictionary
If you don’t supply any value for settings it will try to load your default
settings using the MSTICPYCONFIG environment variable.
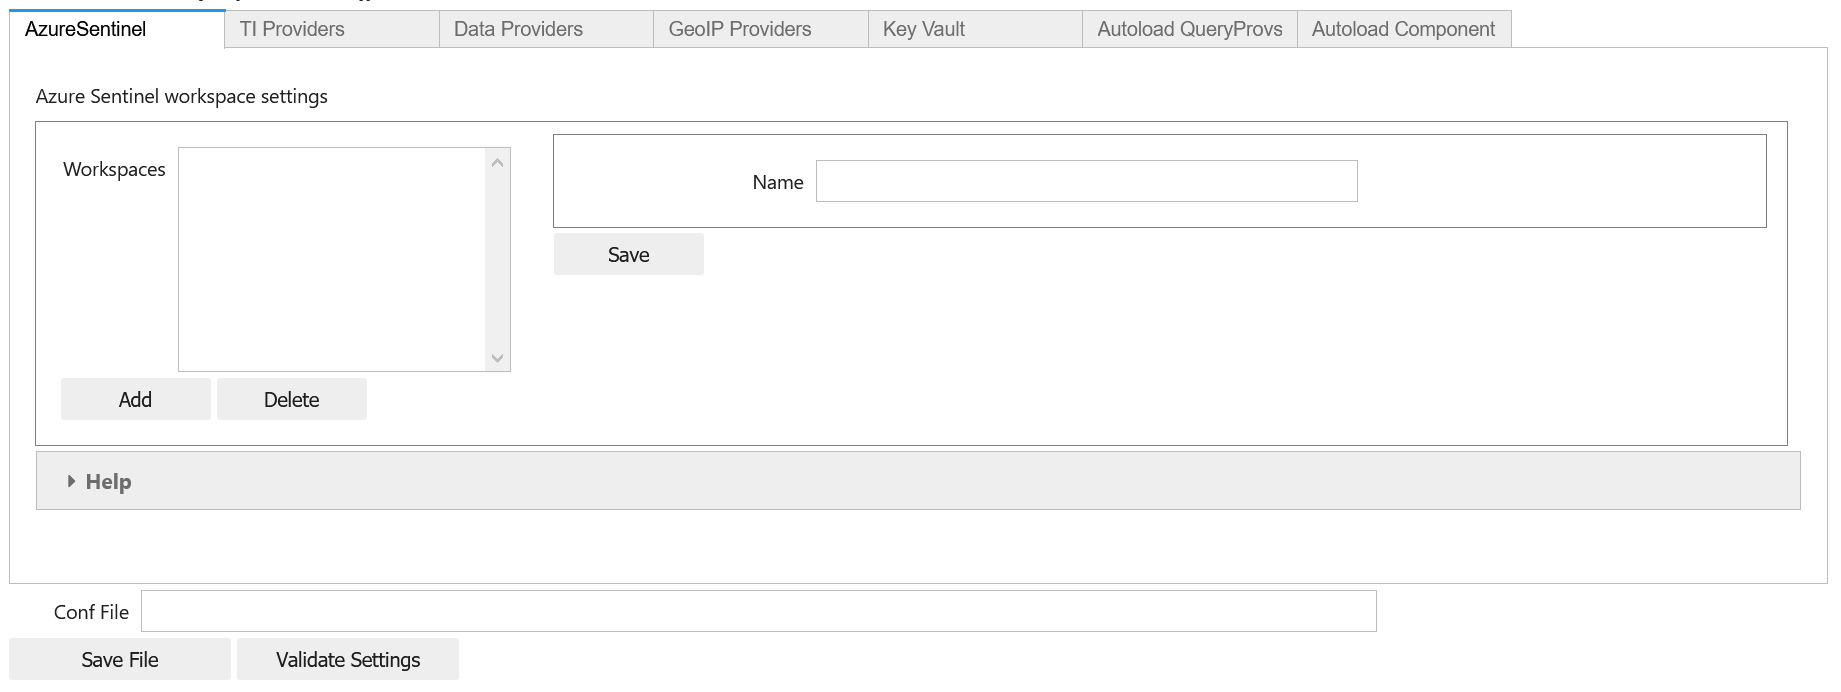
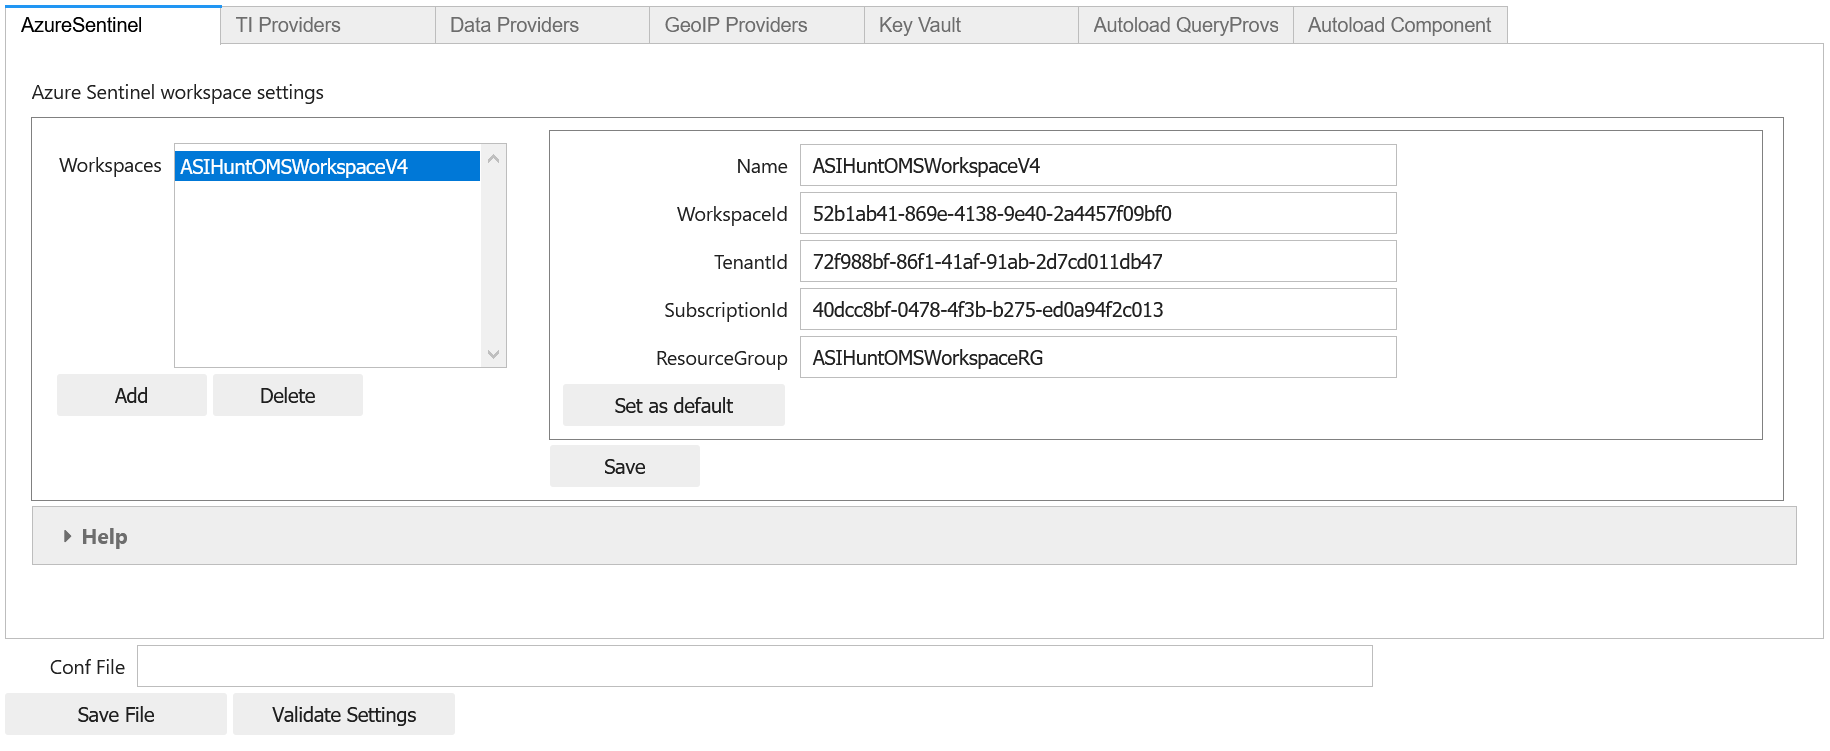
Azure Sentinel Workspaces
If you loaded a config.json file you should see your workspace displayed. If not, you can add one or more workspaces here. The Name, WorkspaceId and TenantId are mandatory. The other fields are helpful but not essential.
Use the Help drop-down panel to find more information about adding workspaces and finding the correct values for your workspace.
If this the workspace that you use frequently or all of the time, you may want to set this as the default. This creates a duplicate entry named “Default” and this is used when you connect to AzureSentinel as the default workspace to connect to (you can override this by specifying a workspace name at connect time).
When you’ve finished, type a file name (usually “msticpyconfig.yaml”) into the Conf File text box and click Save File,
You can also try the Validate Settings button. This should show that you have a few missing sections (we’ll fill these in later) but should show nothing under the the “Type Validation Results”.
mpedit = MpConfigEdit(settings=mpconfig)
mpedit
Setting the path to your msticpyconfig.yaml
This is a good point to set up an environment variable so that you can
keep a single configuration file in a known location and always load the
same settings. Of course, you’re free to use multiple configs if you
need to use different settings for each notebook folder. If you don’t
set the MSTICPYCONFIG variable MSTICPy will try to load a
msticpyconfig.yaml from the current directory.
decide on a location for your
msticpyconfig.yamlThis could be in~/.msticpyconfig.yamlor%userprofile%/msticpyconfig.yamlcopy the
msticpyconfig.yamlfile that you just created to this location.set the
MSTICPYCONFIGenvironment variable to point to that location
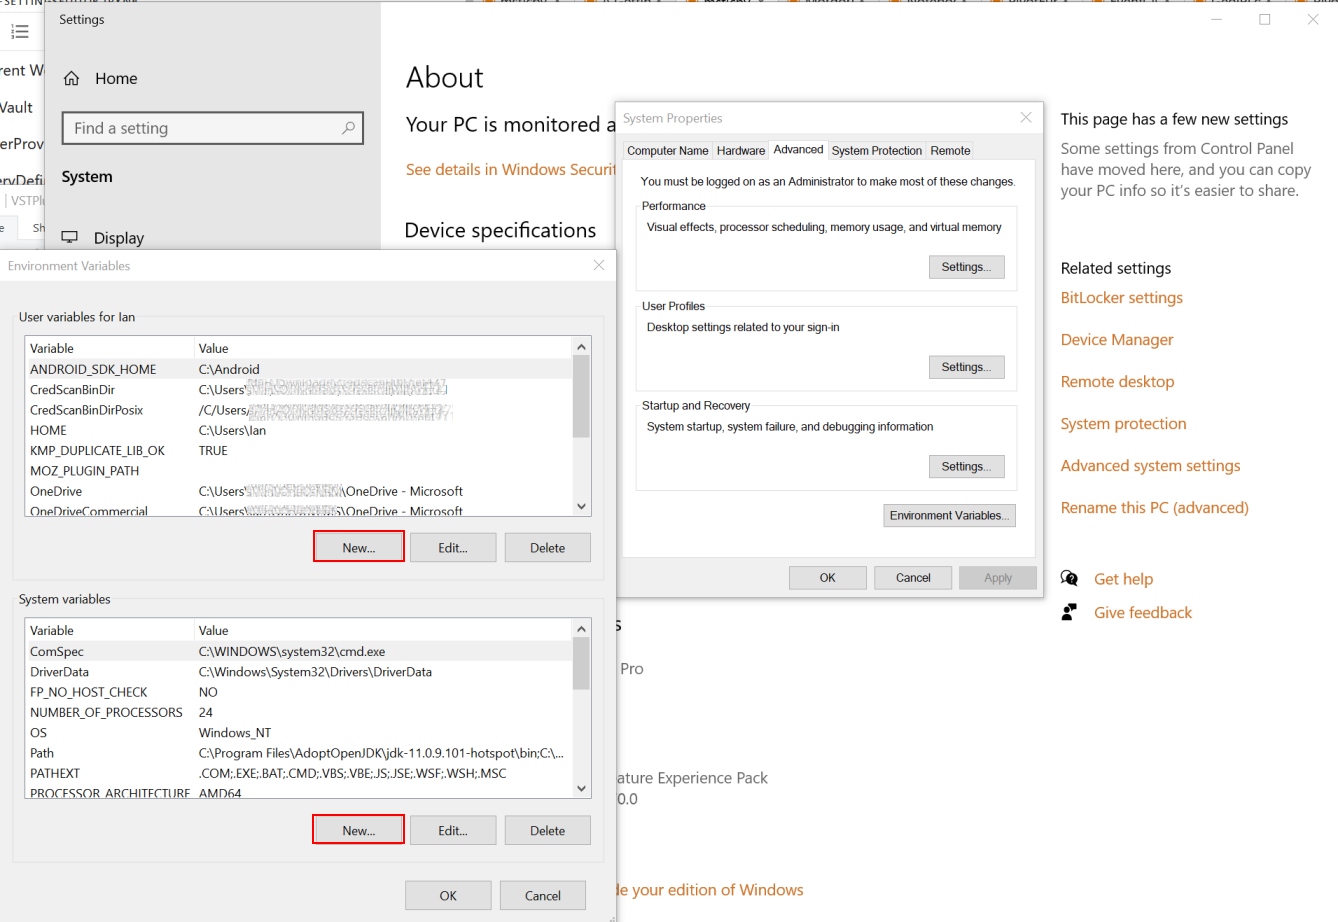
On Windows
On Linux/Mac
In your .bashrc (or somewhere else convenient) add:
export MSTICPYCONFIG=~/.msticpyconfig.yaml
Test auto-loading your msticpyconfig.yaml
In the cell below replace the
./msticpyconfig2.yamlwith the filename from the previous stepRun the cell (Ctrl-Enter or Shift-Enter)
You should see the settings editor loaded with the settings you created earlier
Note
The environment variable set in the cell below is not persistent. To make this persistent you need to add it to a startup file like .bashrc or your Windows registry as described above.
%env MSTICPYCONFIG=./msticpyconfig2.yaml
mpedit = MpConfigEdit()
mpedit
You should see your saved settings displayed.
More Settings
Adding Threat Intelligence (TI) Providers
You will likely want to do lookups of IP Addresses, URLs and other items to check for any Threat Intelligence reports. To do that you need to add the providers that you want to use. Most TI providers require that you have an account with them and supply an API key or other authentication items when you connect.
Most providers have a free use tier (or in cases like AlienVault OTX) are entirely free. Free tiers for paid providers usually impose a certain number of requests that you can make in a given time period.
For account creation, each provider does this slightly differently. Use the help links in the editor help to find where to go set each of these up.
Assuming that you have done this, we can configure a provider. Be sure to store any authentication keys somewhere safe (and memorable).
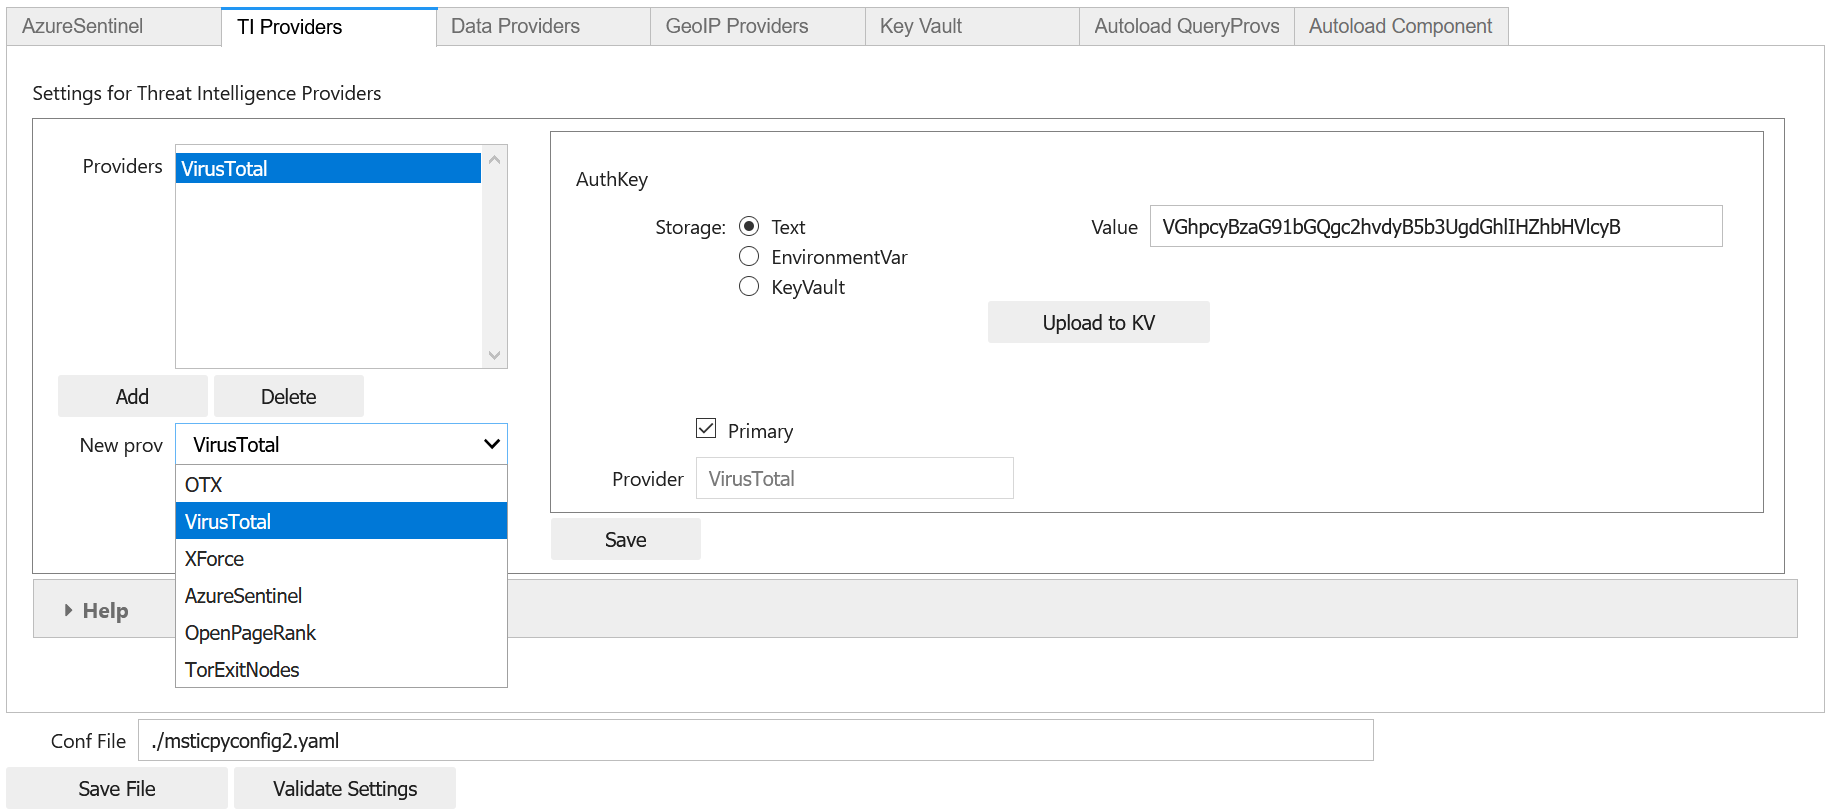
We are going to use VirusTotal (VT) as an example TI Provider. For this you will need a VirusTotal API key from the VirusTotal website. We also support a range of other threat intelligence providers - you can read about this here MSTICPy TIProviders
Taking VirusTotal as our example.
Click on the TI Providers tab
Select “VirusTotal” from the New prov drop-down list
Click Add
This should show you the values that you need to provide:
a single item AuthKey (this is usually referred to as an “API Key”)
You can paste the key into the Value field and click the Save button. Do not surround the value with quotes.
Instead of keeping your key in the configuration file, you can opt to store the VT AuthKey as an environment variable. This is a bit more secure than having it laying around in configuration files. Assuming that you have set you VT key as an environment variable
set VT_KEY=VGhpcyBzaG91bGQgc2hvdyB5b3UgdGhlIHZhbHVlcyB  (Windows)
export VT_KEY=VGhpcyBzaG91bGQgc2hvdyB5b3UgdGhlIHZhbHVlcyB  (Linux/Mac)
Flip the Storage radio button to EnvironmentVar and type the
name of the variable (VT_KEY in our example) into the value box.
You can also use Azure Key Vault to store secrets like these but we will need to set up the Key Vault settings before this will work. This is covered later in Key Vault Secrets and Key Vault.
Click the Save File button to save your changes.
Test that the TI settings work
This assumes that you have set an environment variable pointed at your
msticpyconfig.yaml or have this file in your current directory.
Use the MpConfigFile tool to force MSTICPy to reload settings from the disk,
then run a simple lookup.
mpconfig.refresh_mp_config()

# import the TI module
from msticpy.sectools import TILookup
result = TILookup().lookup_ioc('ed01ebfbc9eb5bbea545af4d01bf5f1071661840480439c6e5babe8e080e41aa')
TILookup.result_to_df(result)
Ioc |
IocType |
QuerySubtype |
Provider |
Result |
Severity |
Details |
RawResult |
Reference |
Status |
|---|---|---|---|---|---|---|---|---|---|
ed01ebfbc9… |
sha256_hash |
VirusTotal |
True |
high |
{‘verbose_msg’: ‘Scan finished, information embedde… |
{‘scans’: {‘Bkav’: {‘d… |
0 |
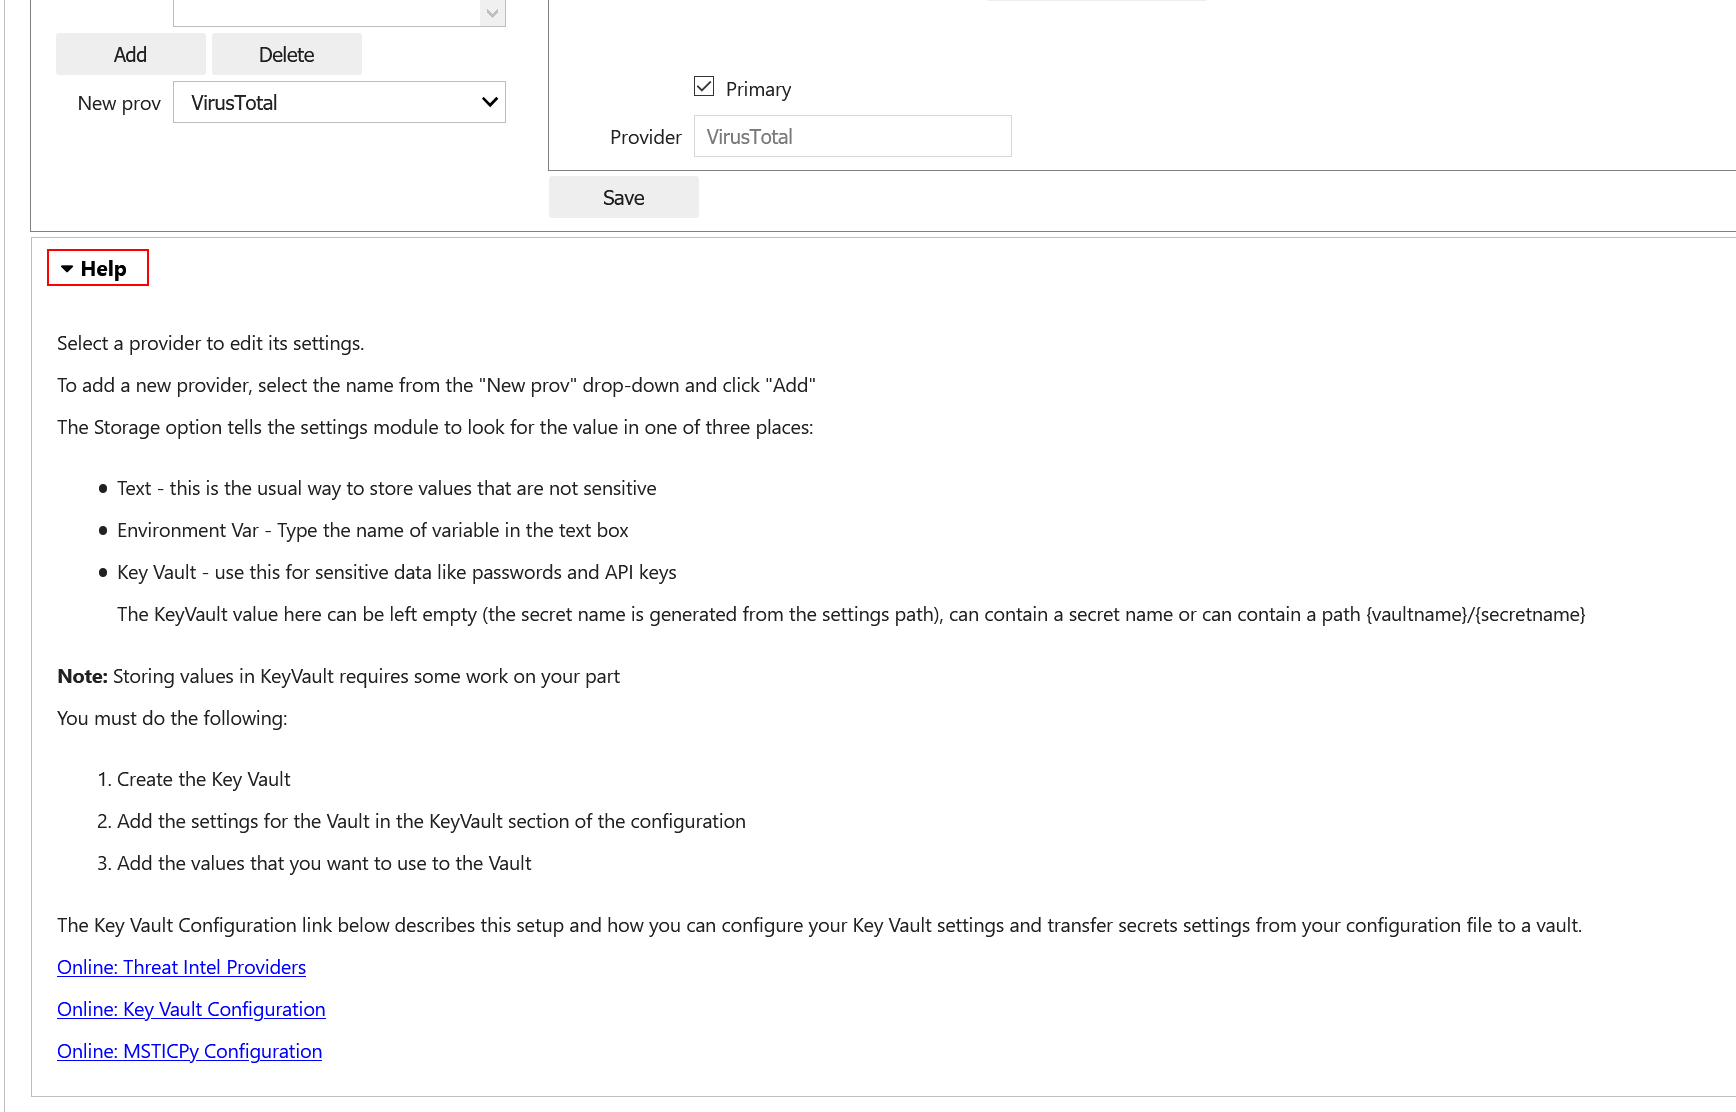
Key Vault Secrets
If you have a secret configured as a text string or set as an environment variable, you can use the Upload to KV button on the to move it to a Vault. You must have Key Vault settings configured before you can do this. See Key Vault later in this document.
MSTICPy will generate a default name for the secret based on the path
of the setting (e.g. “TIProviders-VirusTotal-Args-AuthKey”). If the value
is successfully uploaded the Value field in the settings dialog will
be deleted and the underlying setting replaced with a { "KeyVault": null }
value. MSTICPy will use this to indicate that it should generate the path
automatically when trying to retrieve the key.
If you already have secrets stored in a Key Vault you can enter the secret name in the Value field. If the secret is not stored in your default Vault (the values specified in the Key Vault section), you can specify a path of VaultName/SecretName. Fetching settings from a Vault in a different tenant is not currently supported.
See also the Specifying secrets as Key Vault secrets section of the MSTICPy Package Configuration document.
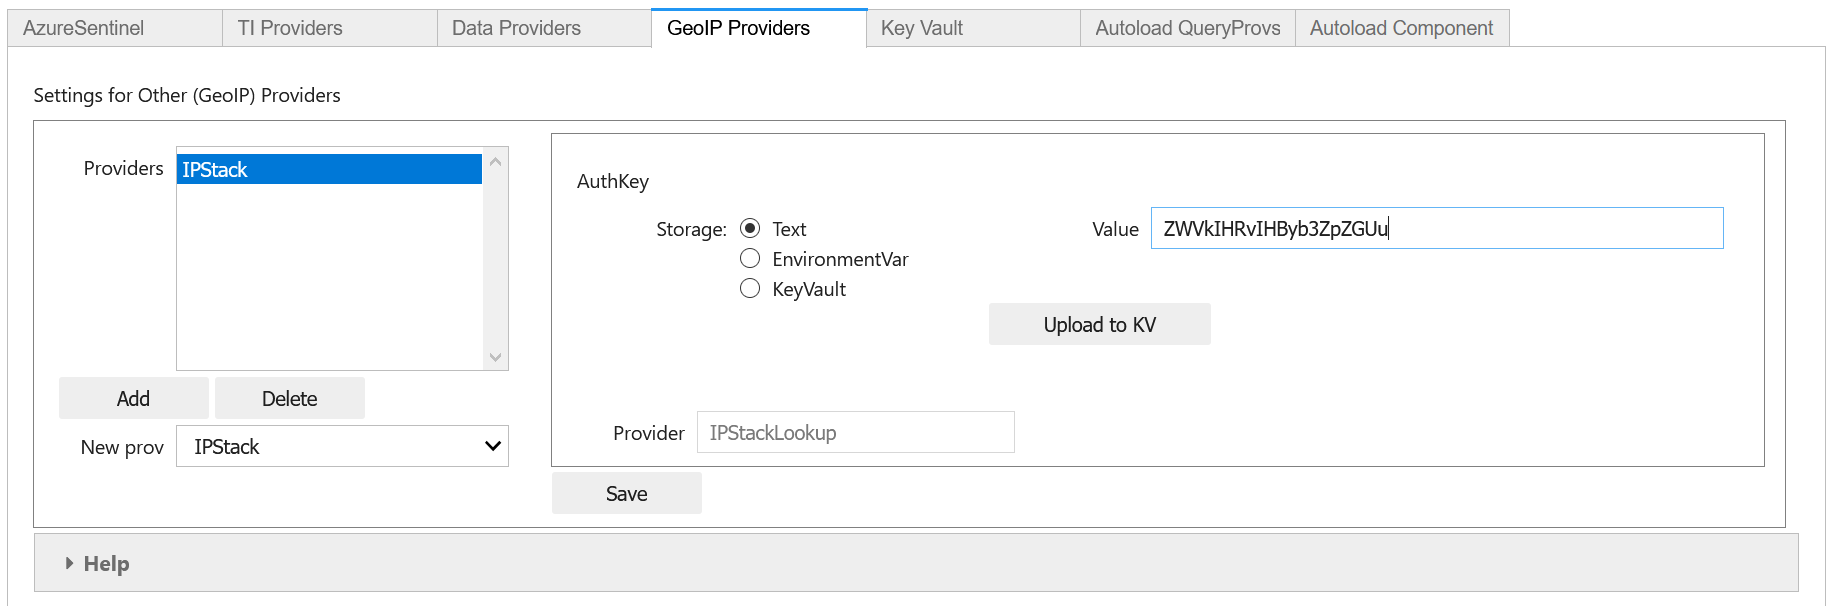
Adding GeoIP Providers
MSTICPy supports two geo location providers - Maxmind GeoIPLite and IP Stack. The main difference between the two is that Maxmind downloads and uses a local database, while IPStack is a purely online solution.
For either you need API keys to either download the free database from MaxMind or access the IPStack online lookup
We’ll use IPStack as our example. You can sign up for a free accounts for IPStack and Maxmind where you can obtain an API key. You’ll need the API for the following steps.
Select “GeoIPLite” from the New Prov
Click Add
Paste your Maxmind key into the Value field
Set the Maxmind data folder: - this defaults to ~/.msticpy
- On Windows this translates to the foldername %USERPROFILE%/.msticpy.
- On Linux/Mac this translates to the folder .msticpy in your home folder.
This folder is where the downloaded GeopIP database will be stored - although you can choose another folder name and location if you prefer.
Note
As with the TI providers, you can opt to store your key as an environment variable or keep it in Key Vault.
Test that the GeoIP settings work
mpconfig.refresh_mp_config()

from msticpy.sectools import IPStackLookup
geoip = IPStackLookup()
geoip.lookup_ip("52.96.165.18")[1][0]
ipaddress
{ 'AdditionalData': {},'Address': '52.96.165.18',
'Location': { 'AdditionalData': {},
'City': 'Quincy',
'CountryCode': 'US',
'CountryName': 'United States',
'Latitude': 47.206031799316406,
'Longitude': -119.7993392944336,
'State': 'Washington',
'Type': 'geolocation',
'edges': set()},
'ThreatIntelligence': [],
'Type': 'ipaddress',
'edges': set()}
This is the equivalent for Maxmind GeoLite.
mpconfig.refresh_mp_config()

from msticpy.sectools import GeoLiteLookup
geoip = GeoLiteLookup()
geoip.lookup_ip("52.96.165.18")[1][0]
ipaddress
{ 'AdditionalData': {},'Address': '52.96.165.18',
'Location': { 'AdditionalData': {},
'CountryCode': 'US',
'CountryName': 'United States',
'Latitude': 47.6032,
'Longitude': -122.3412,
'State': 'Washington',
'Type': 'geolocation',
'edges': set()},
'ThreatIntelligence': [],
'Type': 'ipaddress',
'edges': set()}
Azure Cloud and Authentication Settings
Azure Cloud Settings
From version 1.4.0 MSTICPy supports multiple sovereign clouds in addition to the Azure global cloud.
The Azure clouds supported are:
cn - China
de - Germany
usgov - US Government
Configuring MSTICPy to use one of these clouds will cause the following components to use the Authority and API endpoint URLs specific to that cloud.
These components include:
Azure Sentinel data provider
Azure Sentinel API
Azure Data (Azure resource API) provider
Azure Resource graph provider
Azure Key Vault
To set the cloud run the following code in a Jupyter notebook:
mpedit = MpConfigEdit()
mpedit
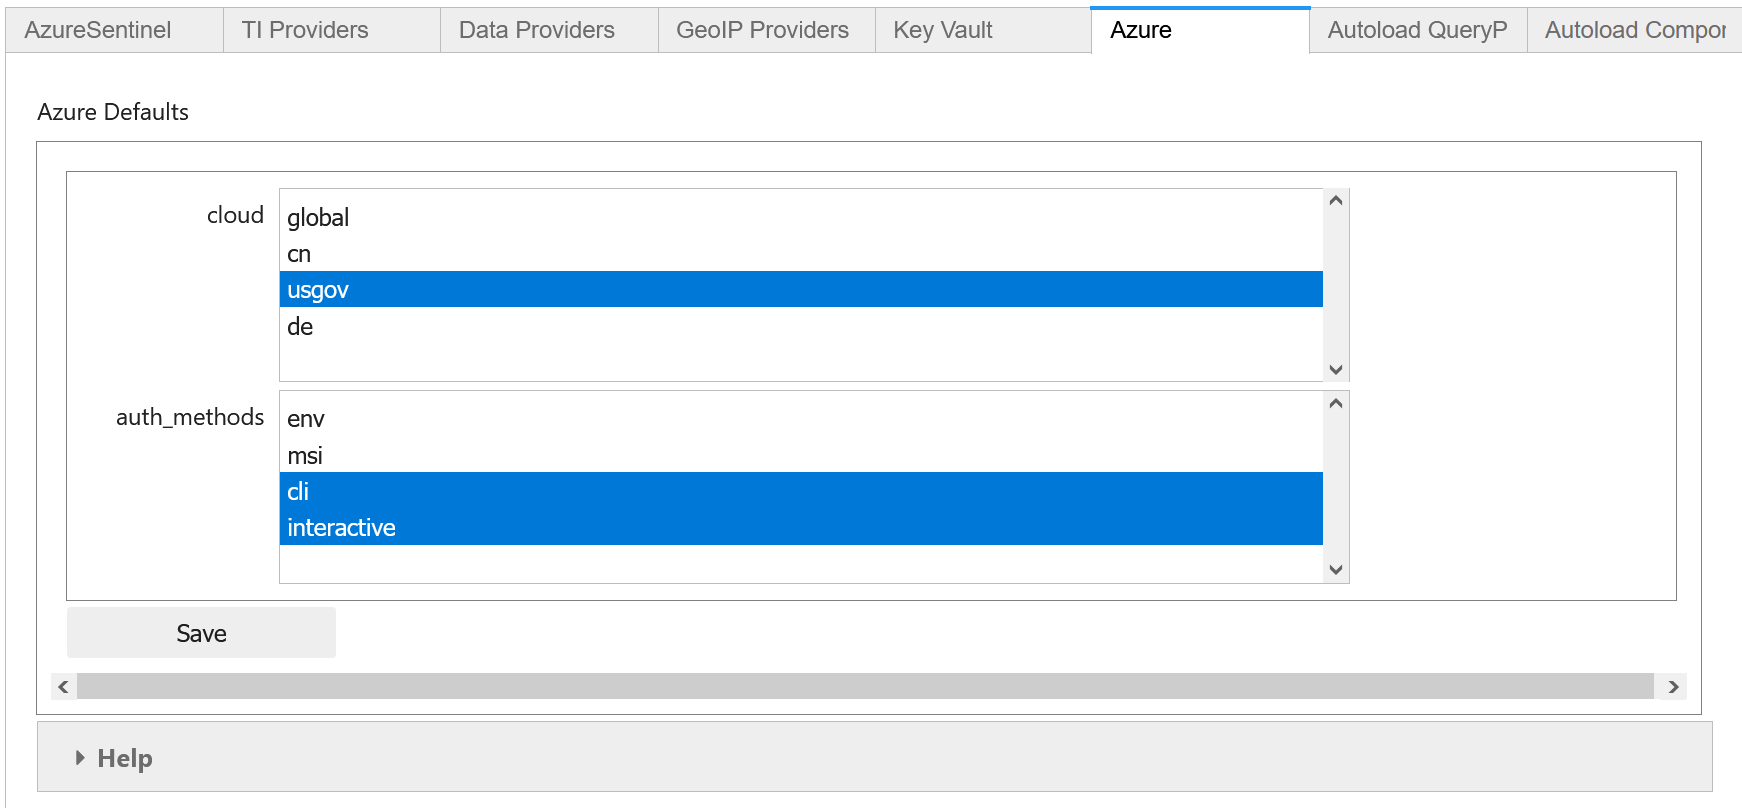
Select the Azure tab and choose the required cloud identifier from the list. Click Save and then Save Settings to update and write the changed settings to your configuration file.
Default Azure authentication methods
In the Azure settings tab you can also specify the default authentication methods that you want to use. The available methods are:
env - Use credentials set in environment variables
cli - Using credentials available in an local AzureCLI logon
msi - Using the Managed Service Identity (MSI) credentials of the machine you are running the notebook kernel on
interactive - Interactive browser logon
You can select one or more of these. When attempting to authenticate, MSTICPy will try each of the selected methods in turn until one succeeds (or they all fail). This uses a mechanism known as a ChainedCredential. This does give you flexibility and a useful fallback, if your preferred authentication method does not work. However, it does take additional time to cycle through multiple methods. If you know, for example, that you always want to use interactive browser logon (with device code authorization), select this one and leave the others unselected.
Note
If you are using a remote Jupyter notebook service such as
Azure Machine Learning, the first three methods refer to things
running on the Jupyter server (the Azure ML Compute). For example,
if you want to use AzureCLI credentials you must run az login on
the compute (you may need to install Azure CLI to do this).
Similarly, with MSI credentials, these are the credentials of the
Jupyter hub server, not the machine that your browser is running
on. For environment variables, these must be set on the
Jupyter server.
MSI authentication is not currently support on AML compute.
Using Azure CLI as your default login method
Due to its ability to cache credentials, we strongly recommend using Azure CLI logon. This allows all MSTICPy Azure functions to try to obtain current credentials from Azure CLI rather than initiate an interactive authentication. This is especially helpful when using multiple Azure components or when using multiple notebooks.
If the host running your notebook kernel does not have Azure CLI installed you can install it from here.
To log in using Azure CLI enter the following:
From a terminal:
az login
From a notebook
!az login
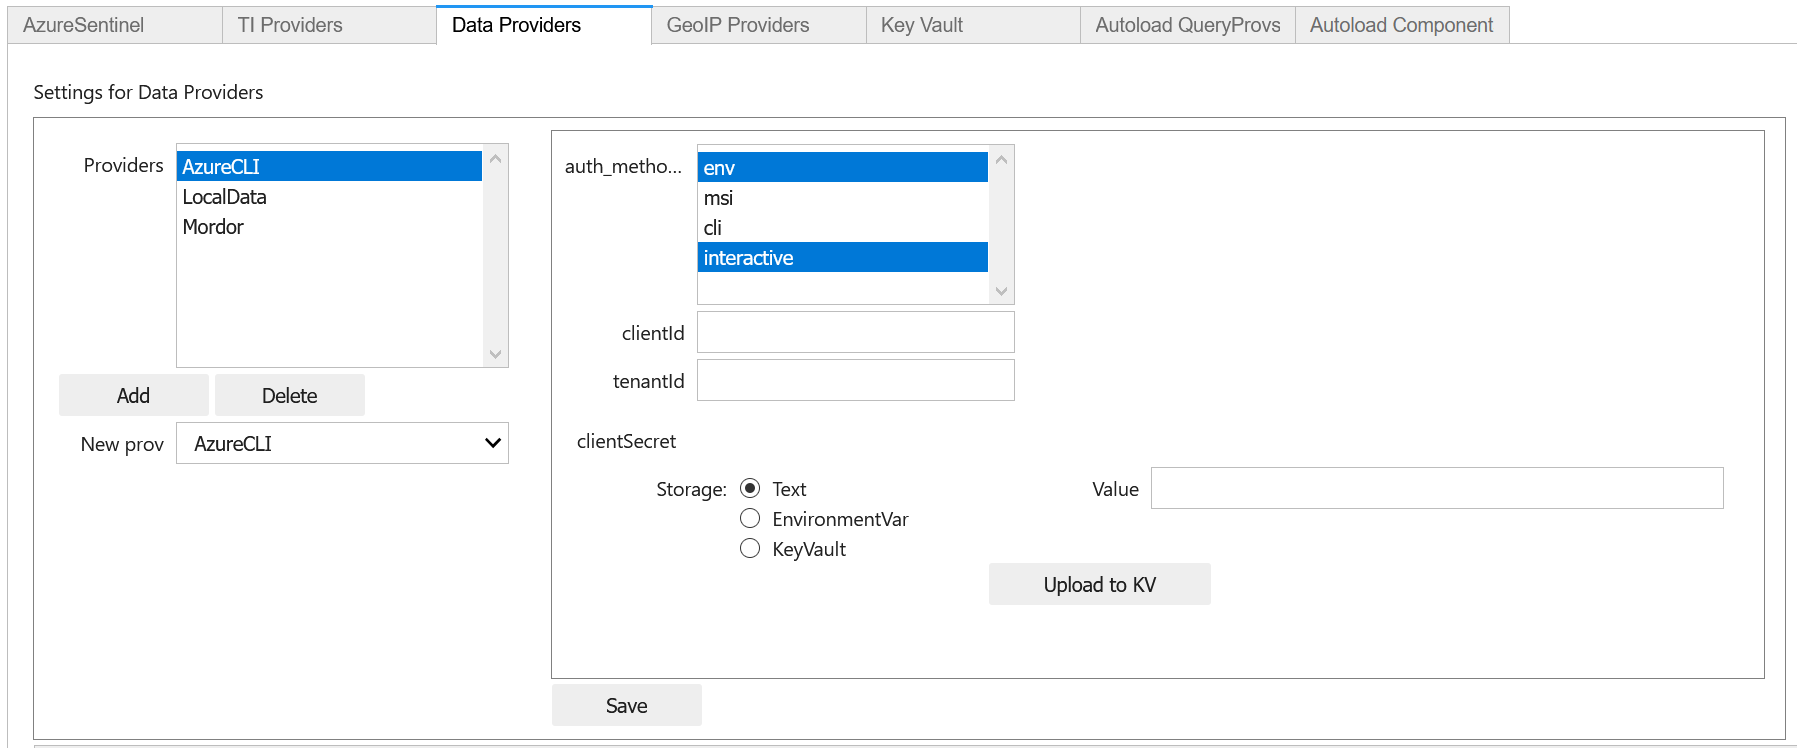
Optional Settings
Other data providers - Splunk, Azure CLI, LocalData, Mordor
Azure API and Azure Sentinel API
If you have set your preferences for Azure authentication methods in the Azure tab you do not need to add the AzureCLI data provider unless you want to explicitly use something other that the defaults for Azure and Azure Sentinel APIs. If you are happy to use the defaults, you can skip the remainder of this section.
See Default Azure authentication methods for details about this.
To access Azure APIs (such as the Sentinel APIs or Azure resource APIs) you need to be able to use Azure Authentication. The setting is named “AzureCLI” for historical reasons - don’t let that confuse you.
We currently support two ways of authenticating:
Chained chained authentication (recommended)
With a client app ID and secret
Chained authentication lets you try up to four methods of authentication as described in Default Azure authentication methods.
To use chained authentication methods select the methods to want to use and leave the clientId/tenantId/clientSecret fields empty.
Splunk
The Splunk provider has many options. Typically you need only:
host (your Splunk server host name)
username
password (you can opt to store this in an environment variable or Key Vault).
You can also supply some or all of these values at startup)
LocalData
This is a data provider that reads from local CSVs or Pickled pandas DataFrames.
You can set the default data paths that it looks in for data files. This can have multiple values:
put each on a new line
do not add quotes
do not escape backslashes (e.g. Windows path ‘e:\myfolder’ is fine.)
Mordor
Note
The Mordor GitHub repo has been renamed to “SecurityDatasets”.
The Mordor provider has two options:
The path to save temporary downloaded files (default is the current directory)
Whether to cache files or delete them immediately after download.
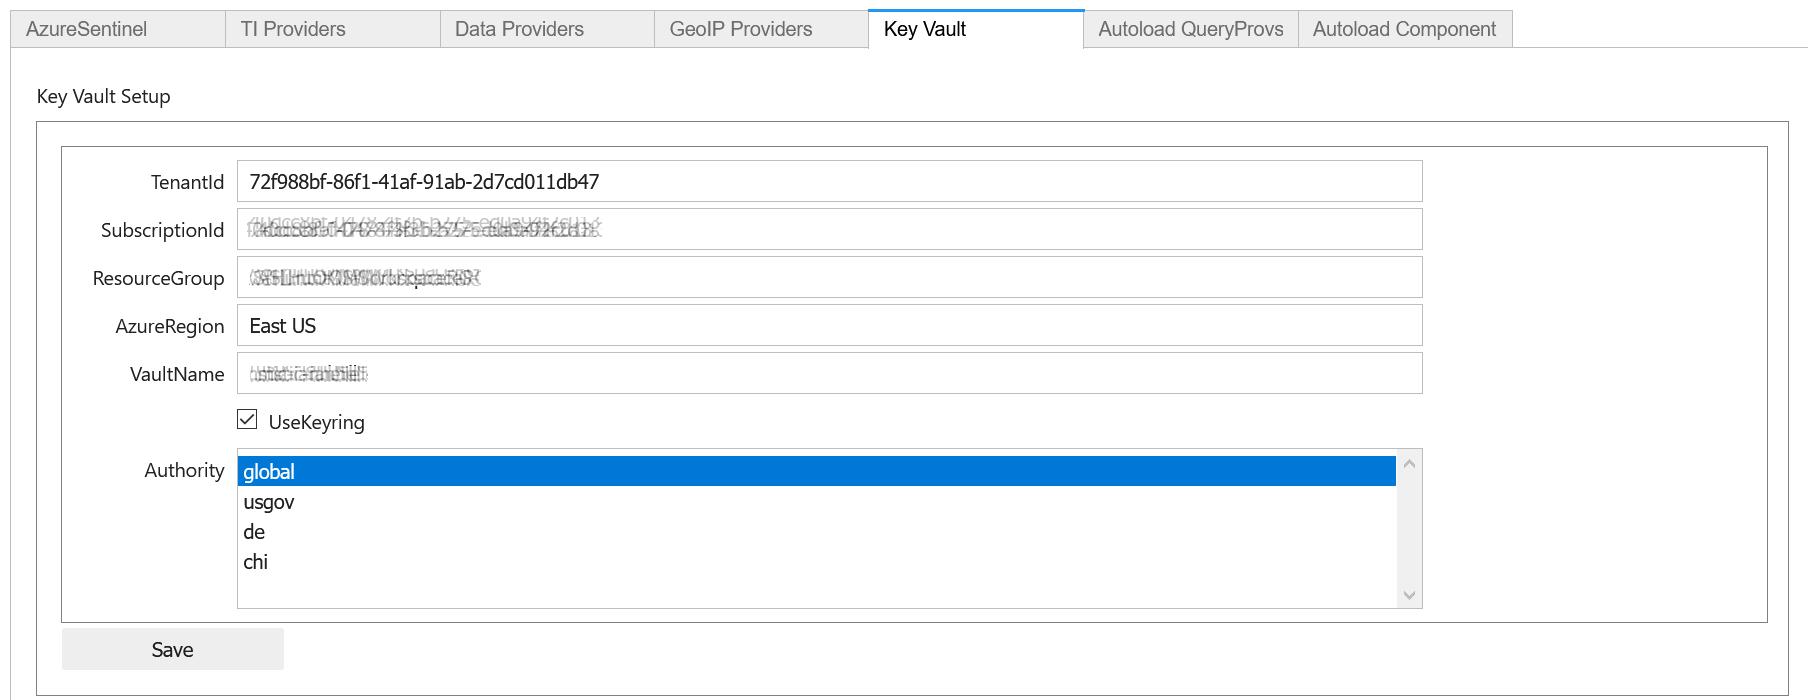
Key Vault
You only need to configure this if you want to store secrets in Azure Key Vault.
You need to create the Key Vault first - do that at your Azure portal. Here is the link for the global KeyVault management portal
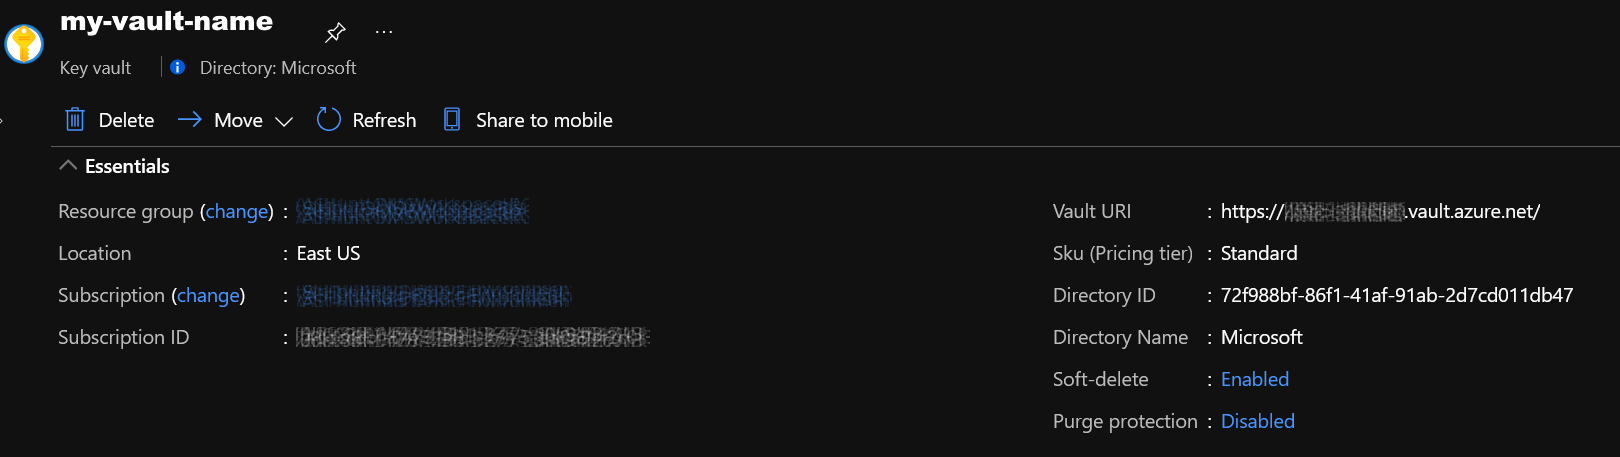
The required settings are all values that you get from the Vault properties (albeit a couple of them have different names):
VaultName is show at the top left of the properties screen
TenantId is shown as Directory ID
AzureRegion is shown as Location
Authority is the cloud for your Azure service.
Only VaultName, TenantId and Authority are required to retrieve secrets from the the Vault. The other values are needed if you opt to create a vault from MSTICPy. See
Note
If you have set values for the Authority in the Azure Settings section (see Azure Cloud and Authentication Settings), you do not need to specify it here. Due to limitations of the configuration editor, you cannot empty an empty value in this tab. If you are using a cloud other than the Azure global cloud, make sure that you either
set the Authority value to the same value as you have set in the Azure settings section
manually delete the KeyVault\Authority value from your msticpyconfig.yaml
For more details see Specifying secrets as Key Vault secrets
The Use KeyRing option is checked by default. This lets you cache Key Vault credentials in a local KeyRing. Not all platforms support this but it is supported on Windows, Mac and most Linux distributions (for Linux wll may need KWallet or Freedesktop Secret Service - for more details see the Keyring documentation.
Warning
You should not enable KeyRing if you do not fully trust the host that the notebook is running on. The “host” in this case is the Jupyter hub server, where the notebook kernel is running, not necessarily the machine that your browser is running on. Keyring does its caching on the host where the notebook kernel is running.
In some cases, you may trust the Jupyter host more than you trust the machine that you are browsing from. Keyring does not transmit any credentials to the browser directly.
Click Save and then Save File when you are done.
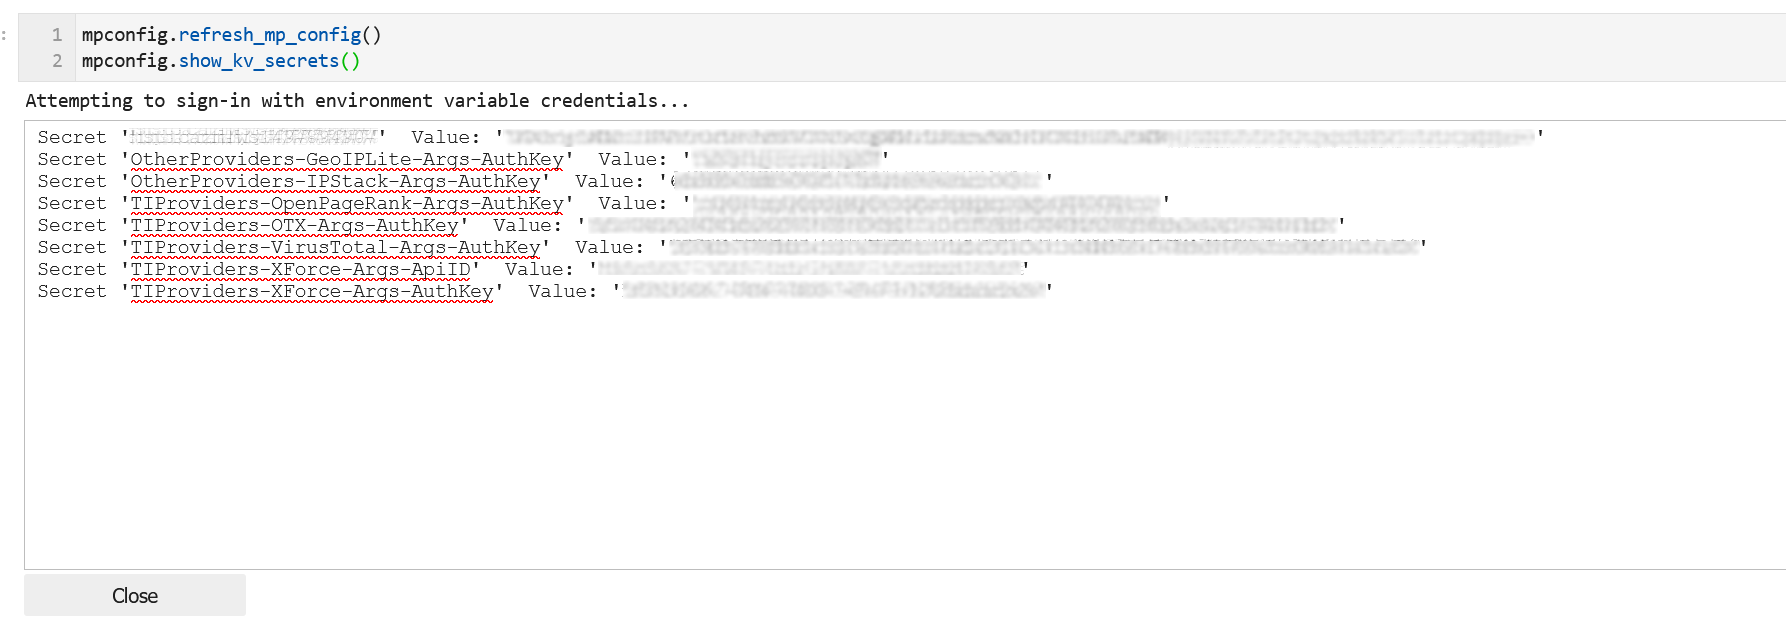
Test Key Vault
See if you can connect and view any secrets. Of course nothing will show up if you haven’t entered a secret. Add a test secret to the vault to show here.
Refresh settings
Try to connect and display secrets
Warning
Don’t leave this output in your saved notebook.
If there are real secrets in the output, use the notebook
Clear output before saving the notebook. Also delete cached copies of
this notebook. Look in the .ipynb_checkpoints sub-folder of this
folder and delete copies of this notebook (although saving the
notebook with cleared output should overwrite the checkpoint copy).
mpconfig.refresh_mp_config()
mpconfig.show_kv_secrets()
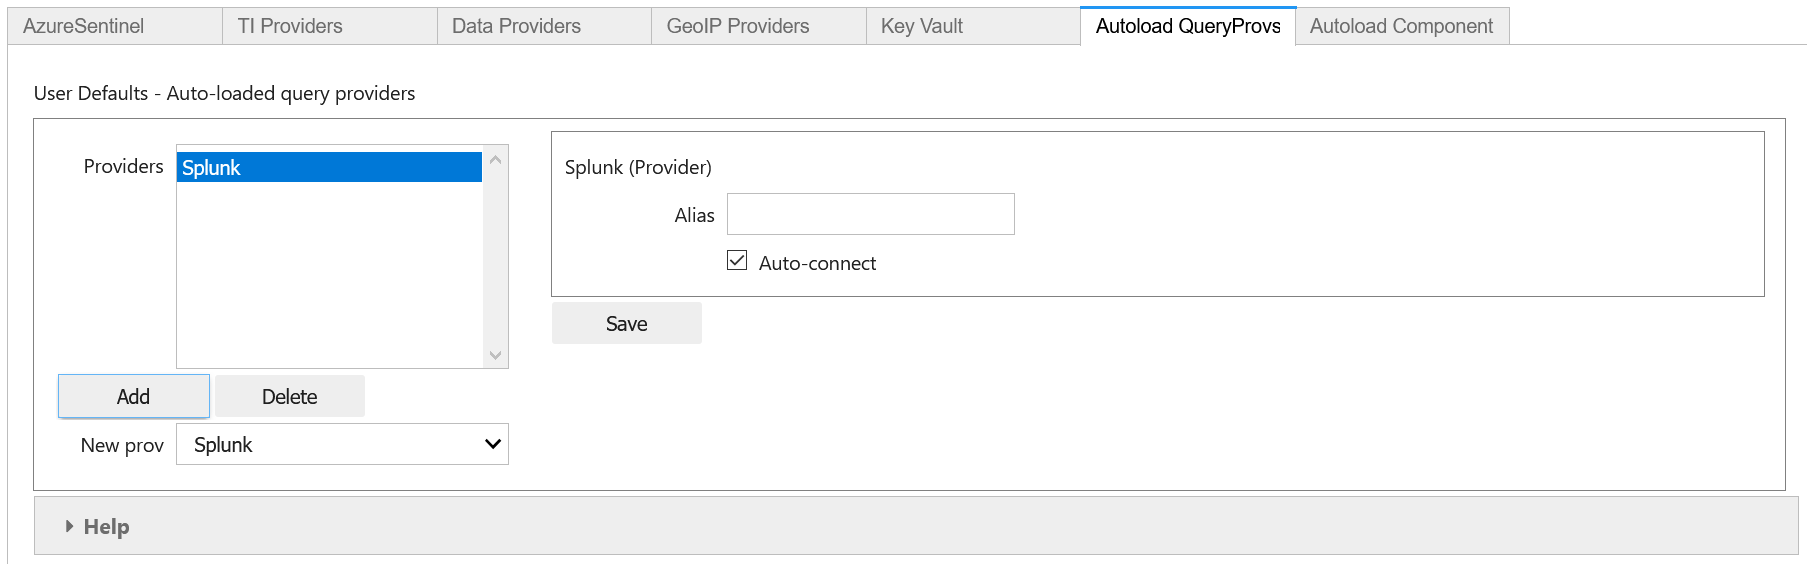
Autoload Query Providers
This section controls which, if any, query providers you want to load
automatically when you run nbinit.init_notebook.
This can save a lot of time if you are frequently authoring new notebooks. It also allows the right providers to be loaded before other components that might use them such as:
Pivot functions
Notebooklets
(more about these in the next section)
There are two types of provider support:
Azure Sentinel - here you specify both the provider name and the workspace name that you want to connect to.
Other providers - for other query providers, just specify the name of the provider.
Available Azure Sentinel workspaces (in the Add Item drop-down) are taken from the items you configured in the Azure Sentinel tab. Other providers are taken from the list of available provider types in MSTICPy.
There are two options for each of these:
connect - if this is True (checked) MSTICPy will try to authenticate to the provider backend immediately after loading. This assumes that you’ve configured credentials for the provider in your settings. Note: if this is not set it defaults to True.
alias - when MSTICPy loads a provider it assigns it to a Python variable name. By default this is “qry_*workspace_name*” for Azure Sentinel providers and “qry_*provider_name*” for other providers. If you want to use something a bit shorter and easier to type/remember you can add an alias. The variable name created will be “qry_*alias*”
Note
If you lose track of which providers have been loaded by
this mechanism they are added to the current_providers attribute
of msticpy
mpedit.set_tab("Autoload QueryProvs")
mpedit
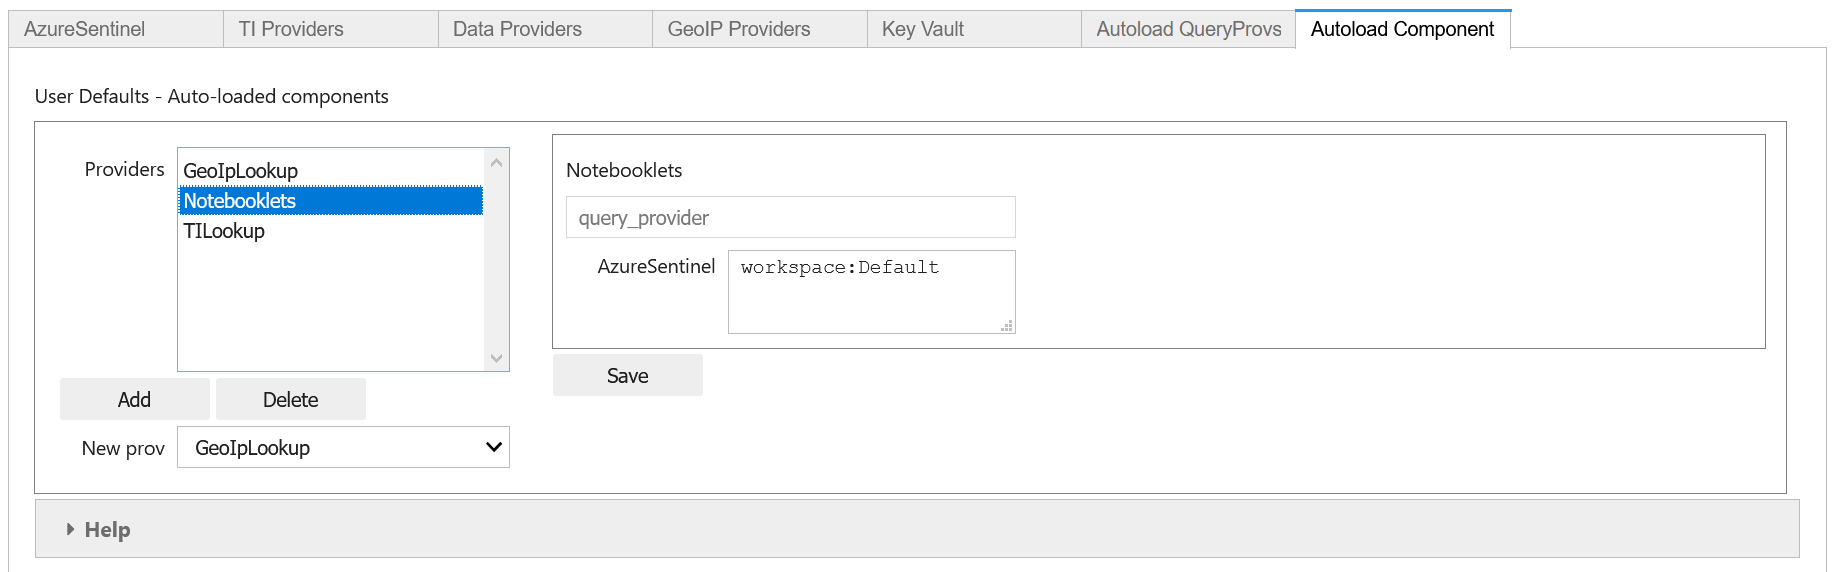
Autoload Component
This section controls which, if other components you want to load
automatically when you run nbinit.init_notebook().
This includes:
TILookup - the Threat Intel provider library
GeopIP - the Geo ip provider that you want to use
AzureData - the module used to query details about Azure resources
AzureSentinelAPI - the module used to query the Azure Sentinel API
Notebooklets - loads notebooklets from the msticnb package
Pivot - pivot functions
These are loaded in this order, since the Pivot component needs query and other providers loaded in order to find the pivot functions that it will attach to entities. For more information see pivot functions
Some components do not require any parameters (e.g. TILookup and Pivot). Others do support or require additional settings:
GeoIpLookup
You must type the name of the GeoIP provider that you want to use - either “GeoLiteLookup” or “IPStack”
AzureData and AzureSentinelAPI
auth_methods - override the default settings for AzureCLI and connect using the selected methods
connnect - set to false to load but not connect
Notebooklets
This has a single parameter block AzureSentinel. At minimum you should specify the workspace name. This needs to be in the following format:
workspace:WORKSPACENAME
WORKSPACENAME must be one of the workspaces defined in the Azure Sentinel tab.
You can also add addition parameters to send to the notebooklets init function: Specify these as addition key:value pairs, separated by newlines.
workspace:WORKSPACENAME
providers=["LocalData","geolitelookup"]
See the msticnb init documentation for more details
Using MpConfigFile to check and manage your msticpyconfig.yaml
You can use MpConfigFile as an interactive control or programmatically.
This tool lets you do the following operations. The function call equivalents are listed against each operation:
UI Button |
Method call |
Notes |
|---|---|---|
Load File |
|
Load a settings file Launch file browser/search |
Load Default |
|
Load your default settings (pointed to by the MSTICPYCONFIG environment variable) |
Save File |
|
|
View Settings |
|
View the text of the settings file |
Validate Settings |
|
Validate loaded settings |
Convert to MP |
|
If you have loaded a |
Show Key Vault Secrets |
|
View secrets in your Key Vault |
Reload Settings |
|
reloads the settings for MSTICPy based on the saved default config file (this is either the file pointed to by MSTICPYCONFIG env variable or a file “msticpyconfig.yaml” in the current directory. |
If you create MpConfigFile() with no parameters this will also load the default settings
You can get more help on these methods from the See
MpConfigFile API documentation
or by using the Python help function:
help(MpConfigFile)