Installing
Python 3.8 or Later
MSTICPy requires Python 3.8 or later. If you are running in hosted environment such as Azure Notebooks, Python is already installed. Please ensure that the Python 3.8 (or later) kernel is selected for your notebooks.
If you are running the notebooks locally, you will need to install Python 3.8 or later. The Ananconda distribution is a good starting point since it comes with many of packages required by MSTICPy pre-installed.
Creating a virtual environment
Note
This is an optional step. You will most likely want to do this if you are installing MSTICPy in a local Python installation. If you are using a cloud notebook environment such as Azure ML you will usually not need to create a virtual environment.
MSTICPy has a significant number of dependencies. To avoid conflicts with packages in your existing Python environment you may want to create a Python virtual environment or a conda environment and install the package there.
For standard python use the venv command to do this
(there are also several alternatives to venv available).
~$ python -m venv my_env
~$ ./my_env/scripts/activate
(my_env) ~$
For Conda use the conda create command from a conda shell.
(base) c:\users\ian> conda create -n my_env
(base) c:\users\ian> conda activate my_env
(my_env) c:\users\ian>
You should see the name of the environment that you’ve just created and activated in the prompt.
Installation
Run the following command to install the base configuration of MSTICPy.
pip install msticpy
or for the latest dev build
pip install git+https://github.com/microsoft/msticpy
Selective Installation - using “extras”
pip supports specification of an additional parameter sequence known as extras. The syntax for this is:
pip install package_name[extra1,extra2,...]
As of version 0.9.0 MSTICPy has its dependencies split into extras. This allows you to install only the packages that you need and avoid the overhead of time and disk space of dependencies that you do not need.
Note
extras do not affect the which code from MSTICPy is installed - only the external libraries on which certain functions inside MSTICPy need to work.
Warning
zshell/MacOS users - you need to escape the first “[“. Otherwise this is interpreted as the start of a file pattern match expression. In other shells such as bash you may find that you need to escape the leading “[” if the extra name matches the pattern of local files in your current directory.
pip install msticpy\[riskiq]
If you are installing a specific version number you should also escape one of the “=” characters
.code:: bash
pip install msticpy[vt]==1.8.2
Extras in MSTICPy
The extras available in MSTICPy are described in the following table:
extra |
Functionality |
Install time (increment) |
Install time (full) |
|---|---|---|---|
[none] |
|
– |
1m:13s |
keyvault |
|
5s |
1m:18s |
azure |
|
1m:36s |
2m:50s |
kql |
|
2m:07s |
3m:20s |
sentinel (aliases: azsentinel azuresentinel) |
|
3m:48s |
5m:00s |
ml |
|
29s |
1m:42s |
splunk |
|
3s |
1m:16s |
vt3 |
|
4s |
1m:17s |
riskiq |
|
6s |
1m:19s |
all |
|
4m:00s |
5m:29s |
dev |
|
1m:17s |
2m:30s |
test |
|
4m:20s |
5m:50s |
The installation times here are meant to be indicative of comparative times for installation - they will vary depending on the performance of your computer and network.
The Install time (increment) column shows times relative to
the base install (i.e. assuming you’ve already run pip install msticpy).
The Install time (full) column shows the time to install the base
plus extra. Both columns assume that the following packages are already
installed: jupyter, pandas and matplotlib.
If you do not specify an “extra” in your pip install command, the base dependencies for MSTICPy will be installed. This has a lot of functionality such as networking, pivoting, visualization but excludes most dependencies that are specific to a particular data environment like Azure Sentinel or Splunk.
Some of the extras, like “all” and “azsentinel” are combinations of other options collected together as a convenience. You can also specify multiple extras during install, separating them with commas.
pip install msticpy[azure,kql]
Warning
when specifying multiple extras, do not leave spaces between the options - just separate with commas.
Missing “extra” exceptions
If you try to use functionality for a component that needs a dependency that you have not installed you will usually get an informative exception message telling you which “extra” option you need to use to enable that feature.
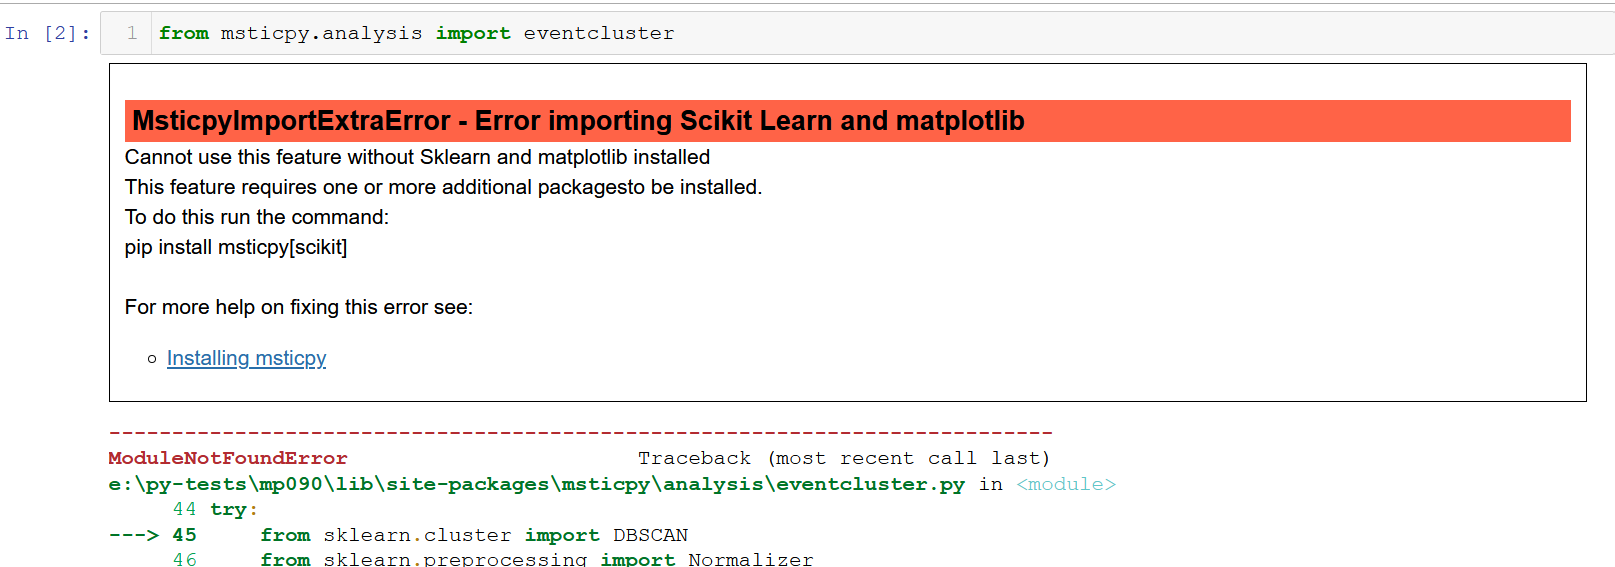
To fix this simply run pip install with the “extra” option shown in the exception message:
python -m pip install msticpy[ml]
Note
In some cases you many not get an informative error. We’ve tried to trap all of the cases but if experience a problem with some MSTICPy functionality (especially an ImportError exception, make sure that you have installed the extra that corresponds to the functionality you are trying to use.
Installing in Managed Spark compute in Azure Machine Learning Notebooks
MSTICPy installation for Managed (Automatic) Spark Compute in Azure Machine Learning workspace requires different instructions since library installation is different.
Note
These notebook requires Azure ML Spark Compute. If you are using it for the first time, follow the guidelines at Attach and manage a Synapse Spark pool in Azure Machine Learning (preview)
Once you have completed the pre-requisites, you will see AzureML Spark Compute in the dropdown menu for Compute. Select it and run any cell to start Spark Session.
Please refer to Managed (Automatic) Spark compute in Azure Machine Learning Notebooks for more guidance and screenshots.
In order to install any libraries in Spark compute, you need to use a conda file to configure a Spark session. Please save below file as conda.yml , check the Upload conda file checkbox. You can modify the version number as needed. Then, select Browse, and choose the conda file saved earlier with the Spark session configuration you want. se, and choose the conda file saved earlier with the Spark session configuration you want.
name: msticpy
channels:
- defaults
dependencies:
- bokeh
- numpy
- pip:
    - msticpy[azure]>=2.3.1
Installing for isolated or semi-isolated environments
There are instances in which you may want to use msticpy in an isolated or semi-isolated environment (e.g. an environment that does not have internet PyPI access to install packages and dependencies).
To do this you need to build a transportable archive of MSTICPy and its dependencies and use that as the source to install from in your target environment.
We have included a set of scripts to simplify some of this process. These are available in the tools folder of the MSTICPy repo.
build_wheel_from_targz.py- builds wheel files from source tar.gz filesinstall_all_whl_files.py- installs all .whl files in a directory to the target environmentdownload_python_package.py- downloads a python package and its dependencies to a directory. This script uses docker to perform the download and allows you to build an install package for a Linux environment from a Windows environment.
In the instructions below we give both the manual steps and the script-based steps. The latter are recommended to avoid repetitious typing and to avoid missing files.
For either manual or script-based installation it is essential that you use the same Python version for both source and target environments, since pip will download the correct version of the package for the Python version that it is executing in. We recommend creating a virtual Python or Conda environment for this purpose (this isn’t required for the docker-based script).
In order to find the correct python version, you can run the following:
python --version
Windows Source to Isolated Windows Environment
On your primary Windows machine with internet access create a virtual environment for the python version you want to use in the target environment.
Download msticpy by running the following:
python -m pip download msticpy --dest \path\to\destination
Within \path\to\destination you should see a .whl file for msticpy and the other dependencies.
Some dependencies may not be .whl files, but tar.gz files.
These files will need to be built into .whl files. To do this, run the following
for each tar.gz file:
python -m pip wheel {file.tar.gz} -w \path\to\destination
or use the script from MSTICPy repo “tools” folder to process all files build_wheel_from_targz.py to build all the tar.gz files in a directory.
Zip and copy the directory folder to your target environment.
From the Isolated environment, unzip if needed and then run the following for each .whl file:
python -m pip install "\path\to\destination\{whl_file.whl}"
Note
If you have an issue installing any of the packages you can use the script from the MSTICPy repo “tools” folder install_all_whl_files.py to help.
Test the installation by running msticpy that suits your needs.
Linux Source to Isolated Linux Environment
Follow the Windows Source to Isolated Windows Environment instructions above.
Windows Source to Isolated Linux Environment
On your source Windows machine with internet access, download Docker for Windows. We are using docker to ensure that the wheels that we are downloading are meant for the Linux architecture.
Run the download_python_package.py script.
Example:
python [path]\download_python_package.py --python-version "3.8.5" --package-name "msticpy[sentinel]" --package-version "2.7.0" --directory \path\to\destination
Copy the directory folder to the isolated environment.
From the isolated environment, unzip if needed and then you will need to run the following for each .whl file:
python -m pip install "\path\to\destination\{whl_file.whl}"
Note
If you have an issue installing any of the packages you can use the script from MSTICPy repo “tools” folder install_all_whl_files.py to help.
Test the installation by running some MSTICPy operations in a Jupyter notebook.
If you are installing within a Jupyter Notebooks, you will need to upload your zip file/directory containing all of the whl files.
If you zipped your transfer archive and need to unzip source files, run the following:
import zipfile
import os
import shutil
file_path =  "./{zip_file_name}"
file_name = os.path.split(file_path)[-1]
file_name_without_ext = os.path.splitext(file_name)[0]
with zipfile.ZipFile(file_path, 'r') as zip_ref:
    zip_ref.extractall(os.path.join(os.getcwd(), file_name_without_ext))
To install the whl files, run the following in a cell:
import os
directory = "/path/to/whl/files/directory" # edit this to match your directory
files = [
    os.path.join(directory, filename)
    for filename in os.listdir(directory)
    if filename.endswith(".whl")
]
for file in files:
    filename = os.path.split(file)[-1]
    print(f"\nAttempting to install {filename}")
    %pip install --quiet --no-index --no-deps --find-links . {file}